By Lawrence Abrams May 18, 2020 08:10 AM 1

Windows 10's built-in Microsoft Defender antivirus solution has many advanced hidden features that allow you to customize how the security software works. Unfortunately, most people do not know these settings exist or even how to access them.
To view and configure the complete list of Microsoft Defender's settings, Windows users need to use the Get-MpPreference and Set-MpPreference PowerShell Commands.
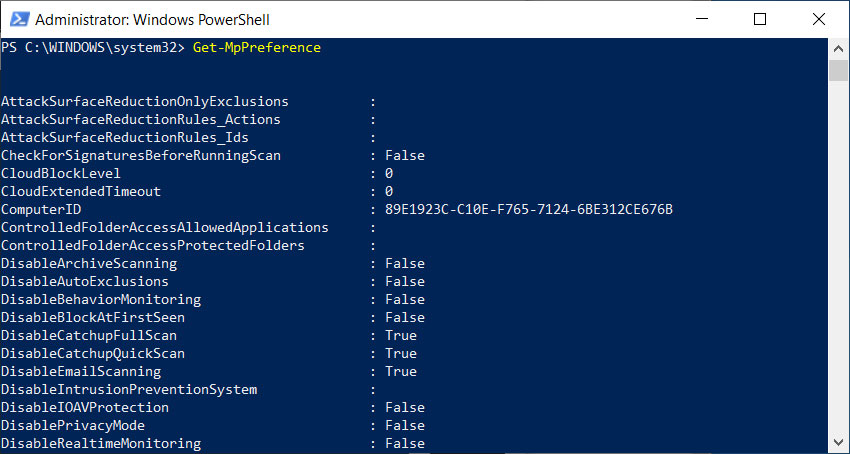
To see what I mean, open an elevated PowerShell Admin prompt and type the Get-MpPreference command to get a list of all the different settings in Microsoft Defender.

READ MORE
 The output of the Get-MpPreference command
As you can see, there are many more Microsoft Defender settings available than the Windows 10 user interface displays or that Microsoft turns on by default.
If you wanted to configure most of these options, you would need to use the Set-MpPreference command from an elevated PowerShell prompt.
For example, to turn off the Behavior Monitoring feature in Microsoft Defender, you would enter the PowerShell command:Set-MpPreference DisableBehaviorMonitoring True
Using ConfigureDefender to manage Microsoft Defender
Now that you know how many hidden advanced settings there are for Microsoft Defender let me introduce you to a utility called ConfigureDefender that allows you to manage them easily.
ConfigureDefender was created as part of the Hard_Configurator project but was also released as a standalone project.
Using this utility, Windows 10 users will get access to a graphical user interface that allows them to view all of Microsoft Defender's settings and easily set them.
"ConfigureDefender utility is a small GUI application to view and configure important Defender settings on Windows 10. It uses PowerShell cmdlets, with a few exceptions to change the Windows Defender settings," ConfigureDefender's GitHub page explains.
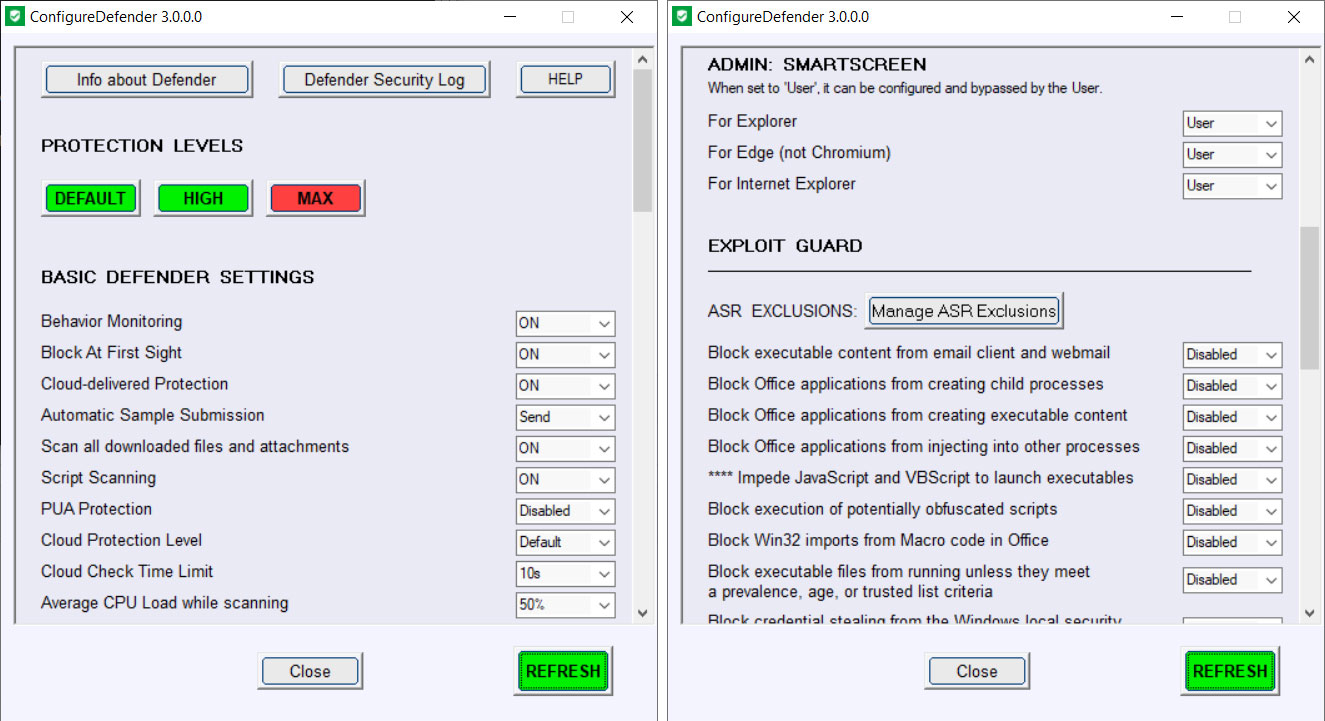
Once started, ConfigureDefender will list your current configuration and allow you to change various settings.
 ConfigureDefender options
ConfigureDefender also includes predefined protection level templates named 'Default', 'High', and 'Max', that when selected, will automatically reduce or increase the protection offered by Microsoft Defender.
According to the ConfigureDefender's documentation, the three templates have the following descriptions:
DEFAULT: Microsoft Windows Defender default configuration which is applied automatically when installing the Windows system. It provides basic antivirus protection and can be used to quickly revert any configuration to Windows defaults.
HIGH: Enhanced configuration which enables Network Protection and most of Exploit Guard (ASR) features. Three Exploit Guard features and Controlled Folder Access ransomware protection are disabled to avoid false positives. This is the recommended configuration that is appropriate for most users and provides significantly increased security.
MAX: This is the most secure protection level which enables all advanced Windows Defender features and hides Windows Security Center. Configuration changes can be made only with the ConfigureDefender user interface. The "MAX" settings are intended to protect children and casual users but can be also used (with some modifications) to maximize the protection. This protection level usually generates more false positives compared to the "HIGH" settings
and may require more user knowledge or skill.
When using these templates, you will be required to reboot Windows 10 before they all go into effect.
The only option ConfigureDefender does not support is the disabling of real-time monitoring as it would cause Microsoft Defender to classify the program as malware.
As you can see, Microsoft Defender is a powerful antivirus solution hampered by the fact that some of its settings are disabled by default.
To get started learning what each setting does and increase the security of Microsoft Defender, you can read Microsoft's documentation on the Set-MpPreference command.

Windows 10's built-in Microsoft Defender antivirus solution has many advanced hidden features that allow you to customize how the security software works. Unfortunately, most people do not know these settings exist or even how to access them.
To view and configure the complete list of Microsoft Defender's settings, Windows users need to use the Get-MpPreference and Set-MpPreference PowerShell Commands.
To see what I mean, open an elevated PowerShell Admin prompt and type the Get-MpPreference command to get a list of all the different settings in Microsoft Defender.

READ MORE
 The output of the Get-MpPreference command
As you can see, there are many more Microsoft Defender settings available than the Windows 10 user interface displays or that Microsoft turns on by default.
If you wanted to configure most of these options, you would need to use the Set-MpPreference command from an elevated PowerShell prompt.
For example, to turn off the Behavior Monitoring feature in Microsoft Defender, you would enter the PowerShell command:Set-MpPreference DisableBehaviorMonitoring True
Using ConfigureDefender to manage Microsoft Defender
Now that you know how many hidden advanced settings there are for Microsoft Defender let me introduce you to a utility called ConfigureDefender that allows you to manage them easily.
ConfigureDefender was created as part of the Hard_Configurator project but was also released as a standalone project.
Using this utility, Windows 10 users will get access to a graphical user interface that allows them to view all of Microsoft Defender's settings and easily set them.
"ConfigureDefender utility is a small GUI application to view and configure important Defender settings on Windows 10. It uses PowerShell cmdlets, with a few exceptions to change the Windows Defender settings," ConfigureDefender's GitHub page explains.
Once started, ConfigureDefender will list your current configuration and allow you to change various settings.
 ConfigureDefender options
ConfigureDefender also includes predefined protection level templates named 'Default', 'High', and 'Max', that when selected, will automatically reduce or increase the protection offered by Microsoft Defender.
According to the ConfigureDefender's documentation, the three templates have the following descriptions:
DEFAULT: Microsoft Windows Defender default configuration which is applied automatically when installing the Windows system. It provides basic antivirus protection and can be used to quickly revert any configuration to Windows defaults.
HIGH: Enhanced configuration which enables Network Protection and most of Exploit Guard (ASR) features. Three Exploit Guard features and Controlled Folder Access ransomware protection are disabled to avoid false positives. This is the recommended configuration that is appropriate for most users and provides significantly increased security.
MAX: This is the most secure protection level which enables all advanced Windows Defender features and hides Windows Security Center. Configuration changes can be made only with the ConfigureDefender user interface. The "MAX" settings are intended to protect children and casual users but can be also used (with some modifications) to maximize the protection. This protection level usually generates more false positives compared to the "HIGH" settings
and may require more user knowledge or skill.
When using these templates, you will be required to reboot Windows 10 before they all go into effect.
The only option ConfigureDefender does not support is the disabling of real-time monitoring as it would cause Microsoft Defender to classify the program as malware.
As you can see, Microsoft Defender is a powerful antivirus solution hampered by the fact that some of its settings are disabled by default.
To get started learning what each setting does and increase the security of Microsoft Defender, you can read Microsoft's documentation on the Set-MpPreference command.
No comments:
Post a Comment